Follow Me On Social Media!

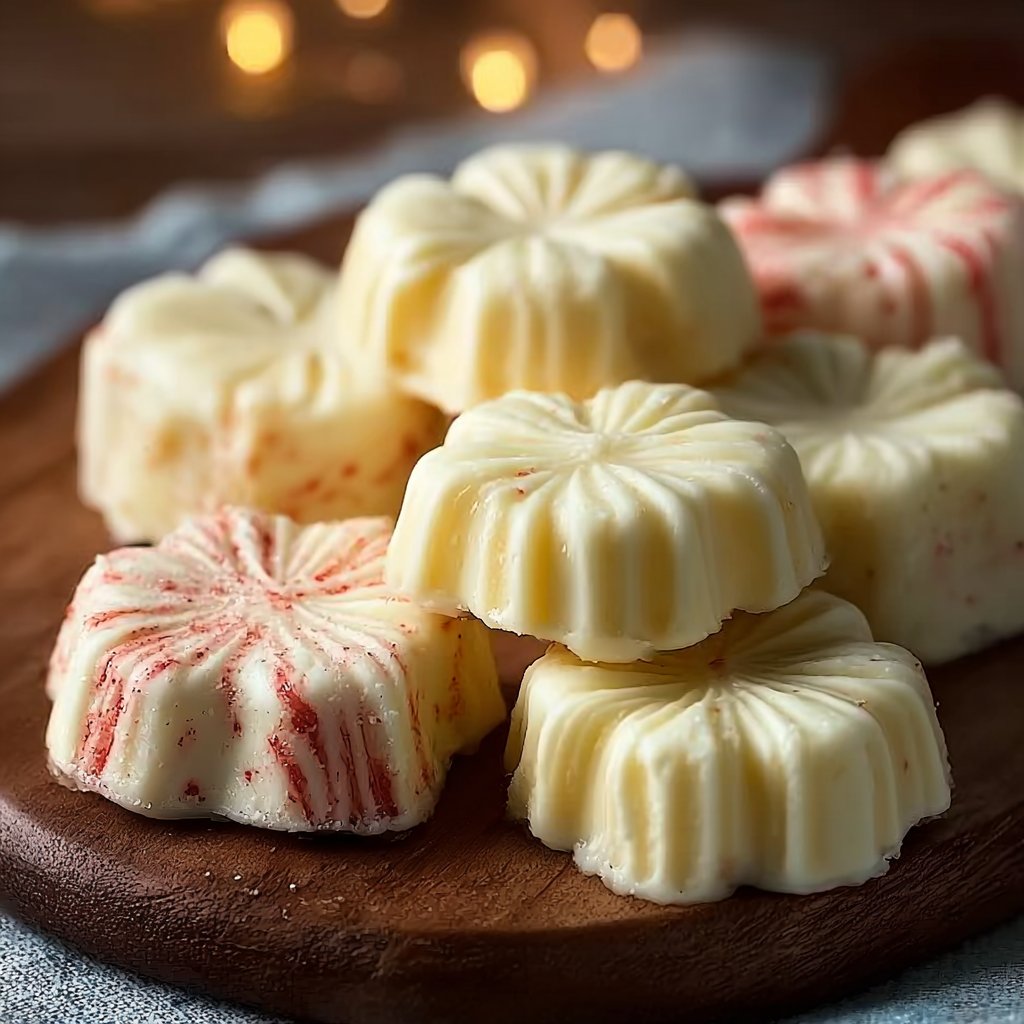
Old-Fashioned Butter Mints
I remember sitting in my grandmother’s kitchen, the warmth of the sun filtering through the curtains and the soothing sound of her humming filled the air. She always had a special treat waiting for us, but nothing was quite like her Old-Fashioned Butter Mints. The sweet, creamy taste mixed with a hint of mint danced on my tongue, and it felt like a warm hug inside my mouth. We would help her in the kitchen, mixing and rolling the colorful mints, all the while laughing and sharing stories. Every holiday season, she brought out these delightful little confections. To me, they are not just a treat; they are a treasure of family memories and love. When I make these Old-Fashioned Butter Mints today, I feel that same warmth and love, and I want to share these delightful bites with you.
Why Make This Recipe
Old-Fashioned Butter Mints carry a special charm that warms hearts and brightens gatherings. First and foremost, making these mints is a wonderful way to connect with family and friends. The process feels like a warm embrace, and you can involve everyone. Kids and adults alike love to get their hands sticky and create beautiful shapes and colors. These mints are soft, creamy, and just the right level of sweet. Imagine offering them during a cozy family gathering or at a cheerful holiday party. They will soon become a favorite treat, and everyone will want the recipe.
Not only do they taste amazing, but these mints also come with the bonus of flexibility. You can customize the flavors and colors to match any occasion. For instance, pastel colors work beautifully for baby showers, while deep, rich colors add elegance to holiday events. On top of that, they store well, meaning you can make them ahead of time without stress. They can last for weeks, always ready to brighten someone’s day. Thus, creating Old-Fashioned Butter Mints turns into a delightful and easy experience, giving you the joy of sharing sweet memories with every bite.
How to Make Old-Fashioned Butter Mints
Ingredients:
- 1 Gel food coloring
- 1/2 tsp Peppermint extract
- 4 cups Powdered sugar
- 1 pinch Salt
- 1/2 cup Butter, unsalted
- 1 tbsp Heavy cream or milk
Directions:
- In a bowl, cream the unsalted butter until smooth.
- Gradually add the powdered sugar and mix until well combined.
- Stir in the peppermint extract and a pinch of salt.
- Add the heavy cream or milk and mix until the mixture is smooth and pliable.
- Divide the mixture into portions and add gel food coloring to each portion, mixing until the desired color is achieved.
- Roll the mixtures into small balls or shapes and place them on wax paper.
- Allow the butter mints to set for several hours or overnight until firm.
- Serve and enjoy your homemade butter mints!
How to Serve Old-Fashioned Butter Mints
Serving Old-Fashioned Butter Mints can add a delightful touch to your gatherings. One great idea is to arrange them in a decorative bowl. You can use a beautiful dishware that matches the theme of your event. Present them on a plate or platter where guests can help themselves easily. These mints are perfect for serving after meals as a sweet finish to dinner or a snack during tea time.
It’s best to serve these mints at room temperature. They remain soft and creamy, allowing them to melt in your mouth. Consider serving them alongside warm beverages like tea or coffee. The minty flavor complements the warmth of these drinks beautifully. You may also add a few more sweets like cookies or cakes for a colorful dessert table. They stand out and remain memorable as a sweet treat that everyone loves.
How to Store Old-Fashioned Butter Mints
Storing your Old-Fashioned Butter Mints is easy, and they stay fresh for a long time. First, allow your mints to set completely on wax paper. After they firm up, place them in an airtight container. Doing so will help keep them moist and chewy. If you need to stack them, place parchment paper between layers to prevent sticking.
You can store them at room temperature, and they will last up to two weeks. If you want them to last even longer, you can refrigerate them. They will still maintain their delicious flavor and texture. Just be mindful of the moisture and seal the container tightly. You can also freeze them! To do this, layer them with parchment paper and place them in a freezer-safe bag. They can stay in the freezer for up to three months. When you want them, just pull them out and let them thaw. Enjoy them fresh once again!
Tips to Make Old-Fashioned Butter Mints
-
Use room temperature butter: For the creamiest mixture, ensure your butter is at room temperature. Softened butter blends well with sugar to create a smooth texture throughout the mints.
-
Sift the powdered sugar: Sifting helps break up lumps in the powdered sugar. This step ensures a smoother and creamier base, resulting in perfect butter mints that melt in your mouth.
-
Taste as you go: Remember to taste the mixture after stirring in the peppermint extract. Adjust the flavor to your liking by adding more peppermint for a stronger kick or keeping it mild.
-
Experiment with colors: Be playful with gel food coloring by mixing colors to achieve unique shades. You can create a rainbow of mints, making it exciting for events like birthday parties or holidays.
-
Store in ideal conditions: To maintain freshness, store the mints in a cool, dry place away from direct sunlight. Moisture can make them sticky, ruining their lovely texture.
-
Roll evenly: When rolling the mints, try to make them uniform in size. This ensures even firmness and a consistent texture. Use a small cookie scoop for perfectly sized portions.
-
Add textures: If you want to mix things up, try adding crushed nuts or shredded coconut to the mixture. This extra texture can make the mints even more enjoyable.
-
Careful with flavoring: While peppermint extract is the classic choice, be careful not to overdo it. A little goes a long way; you can always add more if needed.
Variation Ideas for Old-Fashioned Butter Mints
-
Chocolate Version: For a rich twist, replace peppermint extract with chocolate extract. You can also sprinkle cocoa powder into the mixture. These mints will have a chocolatey flavor that kids will adore.
-
Fruity Version: Swap the peppermint extract with fruit-flavored extracts like raspberry or lemon. This fruity variation offers a refreshing taste that brightens up any dessert table.
-
Nutty Version: Add finely chopped nuts like walnuts or pecans into the mixture for an extra crunch. The nutty flavor enhances the richness of the Old-Fashioned Butter Mints, making them unique.
-
Holiday Version: For festive occasions, incorporate flavors like cinnamon or nutmeg. These spices give your Old-Fashioned Butter Mints a seasonal flair that everyone will love during holidays.
-
Caramel Version: Fold in butterscotch chips for a sweet, caramel twist. You can mix them into the butter mint base, creating gooey goodness that will keep the kids coming back for more.
-
Low-Sugar Version: For a healthier option, use sugar-free powdered sugar. This change results in a creamy texture without all the sugar, making it suitable for those watching their sugar intake.
FAQs of Old-Fashioned Butter Mints
Can I use other flavors besides peppermint?
Absolutely! While peppermint is classic, you can experiment with other flavors like vanilla, almond, or even fruit extracts. Just be mindful of the intensity of these flavors, as they can vary greatly. Start with a small amount, taste, and adjust as needed.
How do I know if the butter mints are firm enough?
After allowing the mints to set, they should feel firm to the touch but not hard. If they are still soft, give them more time to set either at room temperature or in the refrigerator, depending on your preference.
How do I fix mints that are too sticky?
If your mixture ends up too sticky, you can add a little more powdered sugar, a tablespoon at a time, until you reach the desired consistency. Ensure that each addition mixes thoroughly before adding more to prevent the mixture from becoming too dry.
Can I freeze Old-Fashioned Butter Mints?
Yes, you can easily freeze these mints. Just layer them with parchment paper in an airtight container, and they will last for up to three months. When you’re ready to enjoy them, allow them to thaw at room temperature.
What should I do if my mints lose shape?
If your mints don’t hold their shape after rolling, your mixture might be too soft. Refrigerate the mixture for about 30 minutes before rolling again. This will help them firm up and maintain their shape while they set.
How long do these mints last?
Old-Fashioned Butter Mints can last about two weeks at room temperature in an airtight container. If refrigerated, they can last longer while still retaining their delightful flavor and texture.
Making Old-Fashioned Butter Mints is not merely about the end product; it’s about creating beautiful memories and sharing them with those you love. So gather your loved ones, make some magic in the kitchen, and relish every sweet moment!
Print
Old-Fashioned Butter Mints
- Total Time: 15 minutes
- Yield: 4 servings 1x
- Diet: Vegetarian
Description
A nostalgic treat that combines sweet, creamy flavors with a hint of mint, perfect for family gatherings and holidays.
Ingredients
Scale
- 1 Gel food coloring
- 1/2 tsp Peppermint extract
- 4 cups Powdered sugar
- 1 pinch Salt
- 1/2 cup Butter, unsalted
- 1 tbsp Heavy cream or milk
Instructions
- In a bowl, cream the unsalted butter until smooth.
- Gradually add the powdered sugar and mix until well combined.
- Stir in the peppermint extract and a pinch of salt.
- Add the heavy cream or milk and mix until the mixture is smooth and pliable.
- Divide the mixture into portions and add gel food coloring to each portion, mixing until the desired color is achieved.
- Roll the mixtures into small balls or shapes and place them on wax paper.
- Allow the butter mints to set for several hours or overnight until firm.
- Serve and enjoy your homemade butter mints!
Notes
These mints can be customized with different flavors and colors to suit any occasion. Store in an airtight container for freshness.
- Prep Time: 15 minutes
- Cook Time: 0 minutes
- Category: Dessert
- Method: No-Cook
- Cuisine: American
Nutrition
- Serving Size: 2 mints
- Calories: 50
- Sugar: 10g
- Sodium: 20mg
- Fat: 2.5g
- Saturated Fat: 1g
- Unsaturated Fat: 1.5g
- Trans Fat: 0g
- Carbohydrates: 8g
- Fiber: 0g
- Protein: 0g
- Cholesterol: 5mg
Keywords: butter mints, holiday treats, sweet confections, family recipes, homemade candies